Signed Payloads
As of March 4, 2022, all card programs in Production using APTO's SDKs or Mobile API are required to implement Signed Payloads. This is a mandatory update that must be completed to avoid program suspension. Before applying to Production, we encourage you to sign payloads on Sandbox as well. Please follow this guide for more information, or contact programsupport@aptopayments.com with any questions.
Introduction
Apto provides a way to verify the origin of the requests when calling certain endpoints within the Mobile API.
The following endpoint requires a signed payload:
This allows you to perform operations against these endpoints from authorized clients only. This means that before sending back a response, you can validate that the user exists in your system and is approved for a card to be created prior to sending it back to Apto. A new user will not be created until you approve them, at which point a card can be issued. This is why the signed payload has to go through your server to be signed before being sent to Apto. Not sure how signed payloads work? Please read our Usage section to learn more about implementing a server with an endpoint in charge of signing payloads.
To make this work, Apto expects you to send signed payloads using JWT assuming the feature has been enabled in the developer portal.
You can use this resource by Auth0 to learn more about JWT and use the debugger in case you encounter issues while generating the signed token.
Generate RSA key pair
There are several ways to generate the RSA key pair, and you may already have your own. We have outlined 2 options to generate an RSA key pair, but you may choose to do this via your preferred method. Apto recommends keys longer than 1024 characters.
Reminder - Make sure you store the private key in a secure location. The private key is going to be used to sign JWT payloads when calling the verified endpoints.
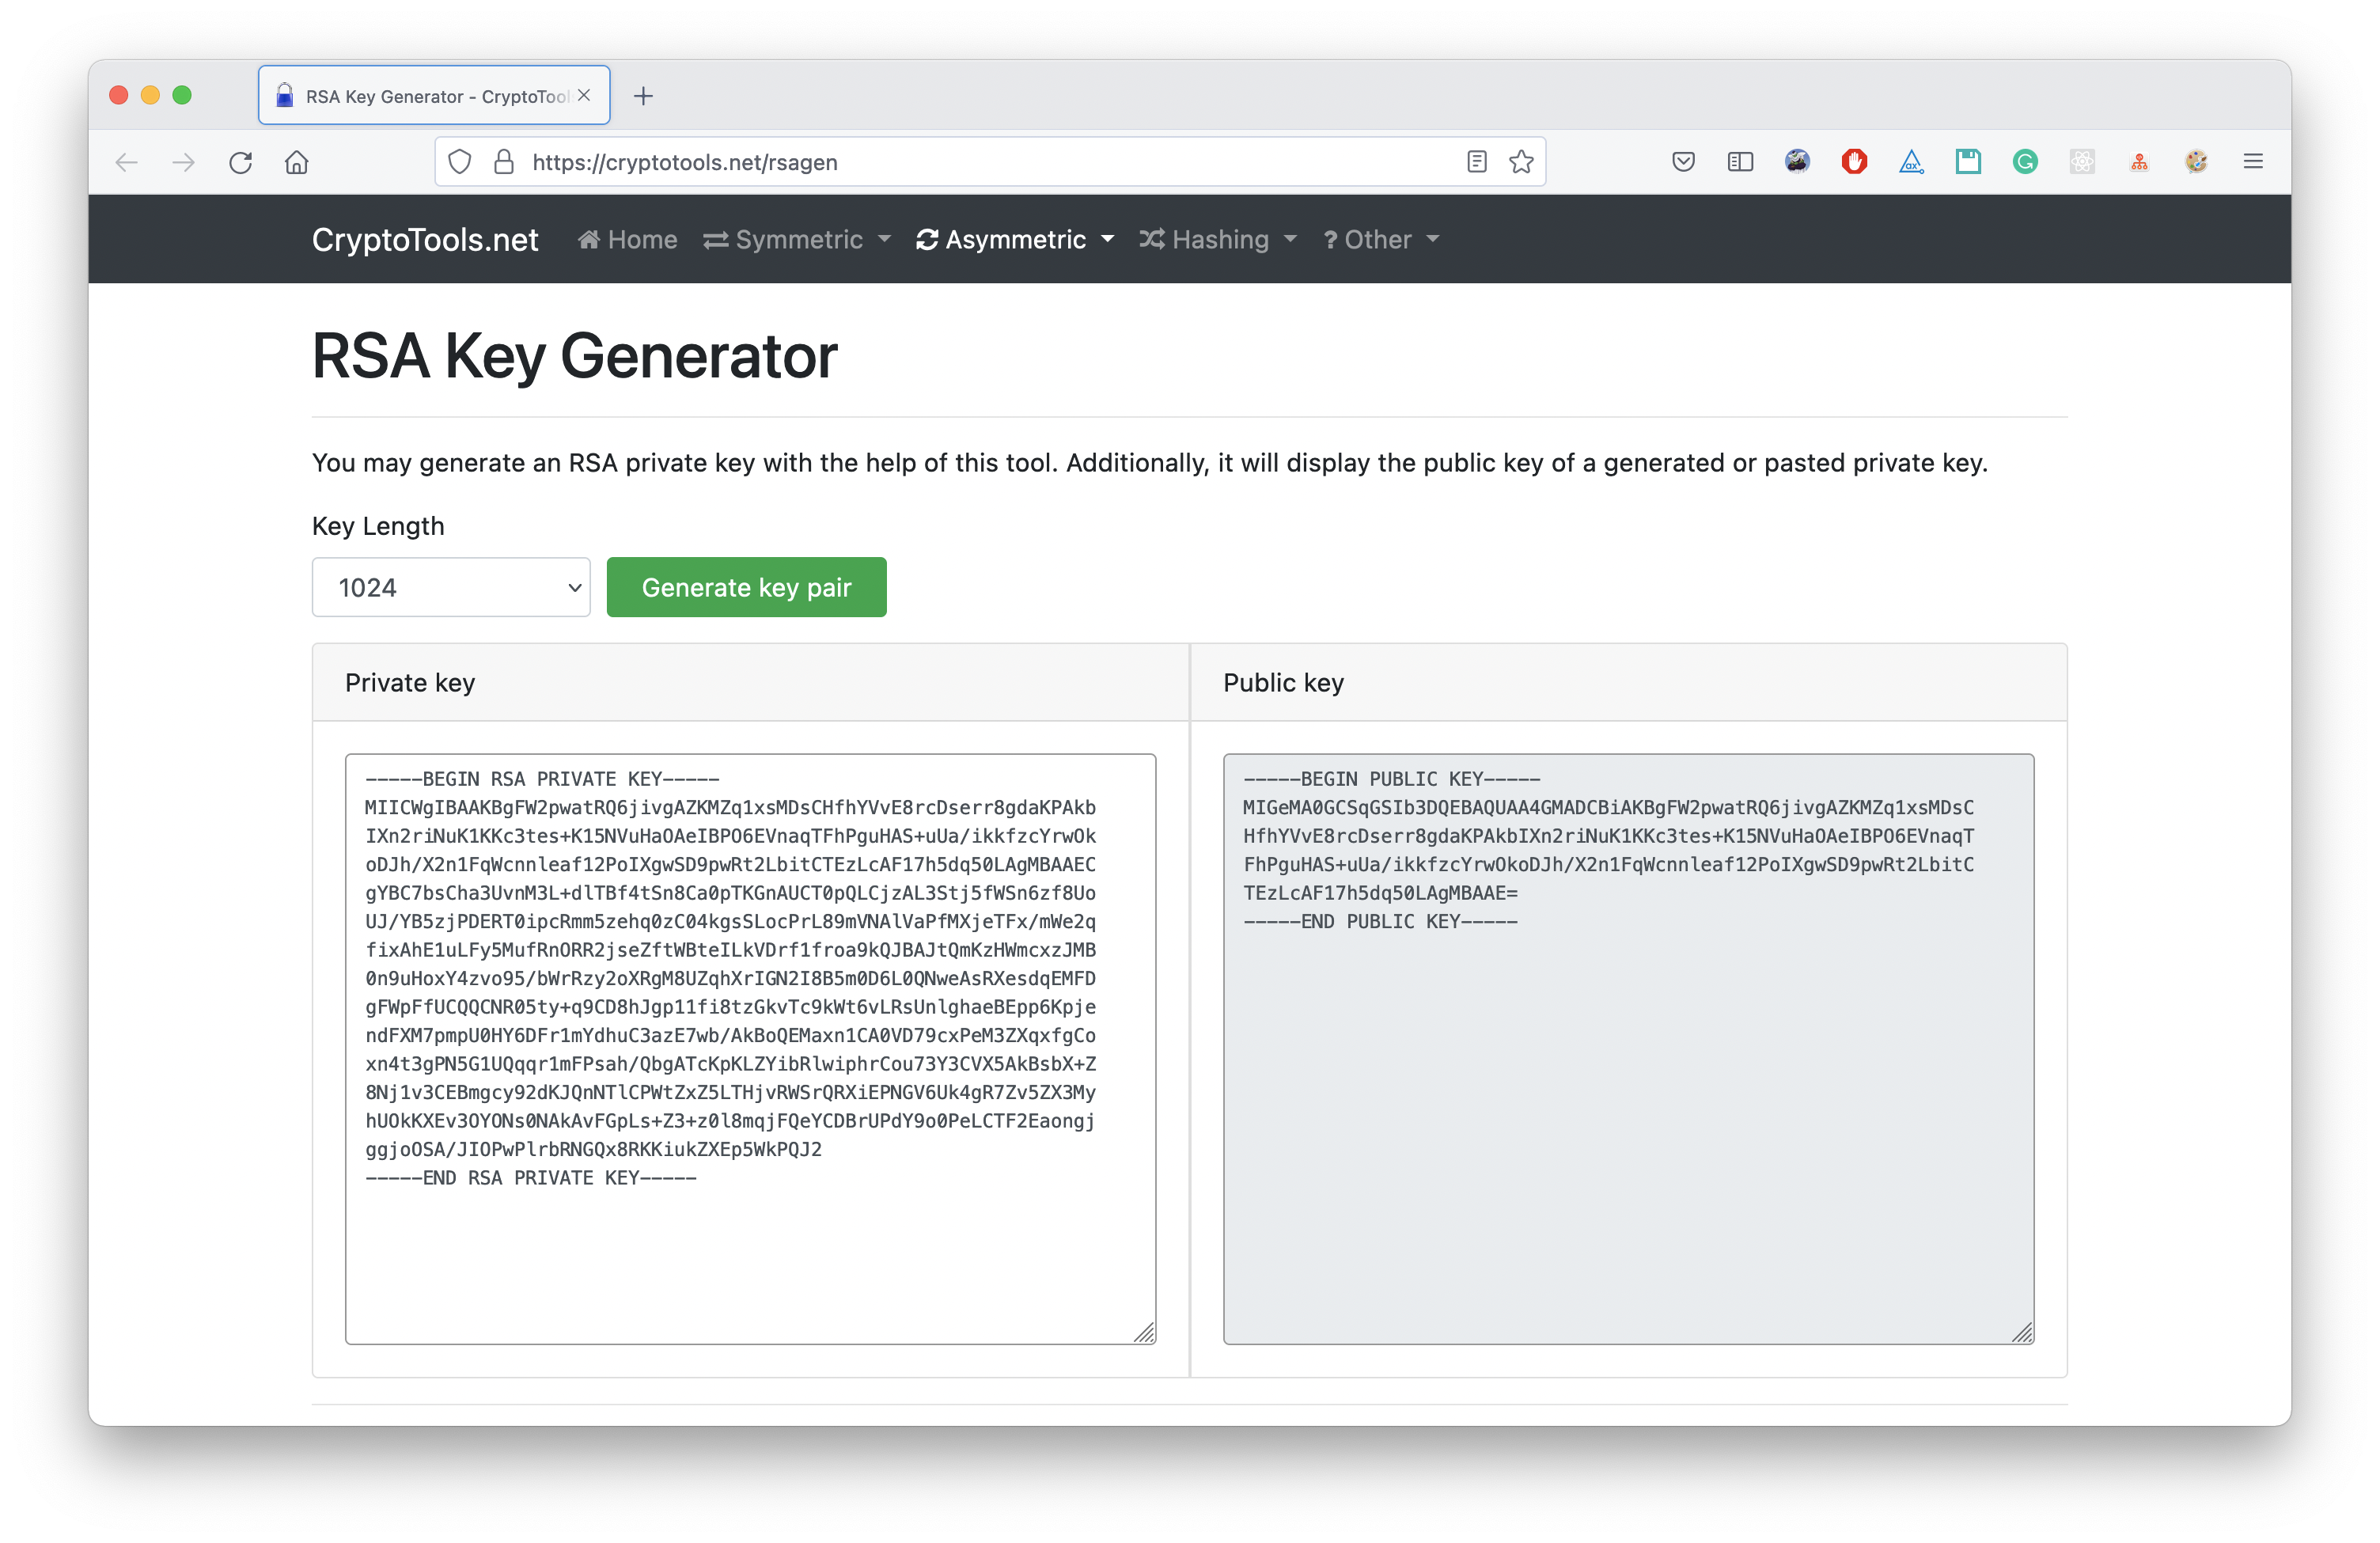
Online tool
In this page you can generate a RSA key pair (this website is not managed by Apto).
MAC OS terminal
You can also generate a key pair in your terminal with OpenSSL. The first step is to generate the private key and store it in a file. The following example stores the key in the private.pem file.
$ openssl genrsa -out private.pem
Then, you need to extract the public key and store it in a file or display it in the terminal window, depending on your preference. The following example saves the public key in a file called public.pem.
$ openssl rsa -in private.pem -pubout -out public.pem
Apto's Sandbox and Production environments require two separate key pairs. When applying for Production access, you will be asked to upload a new key that is unique to the Production environment.
Upload a key
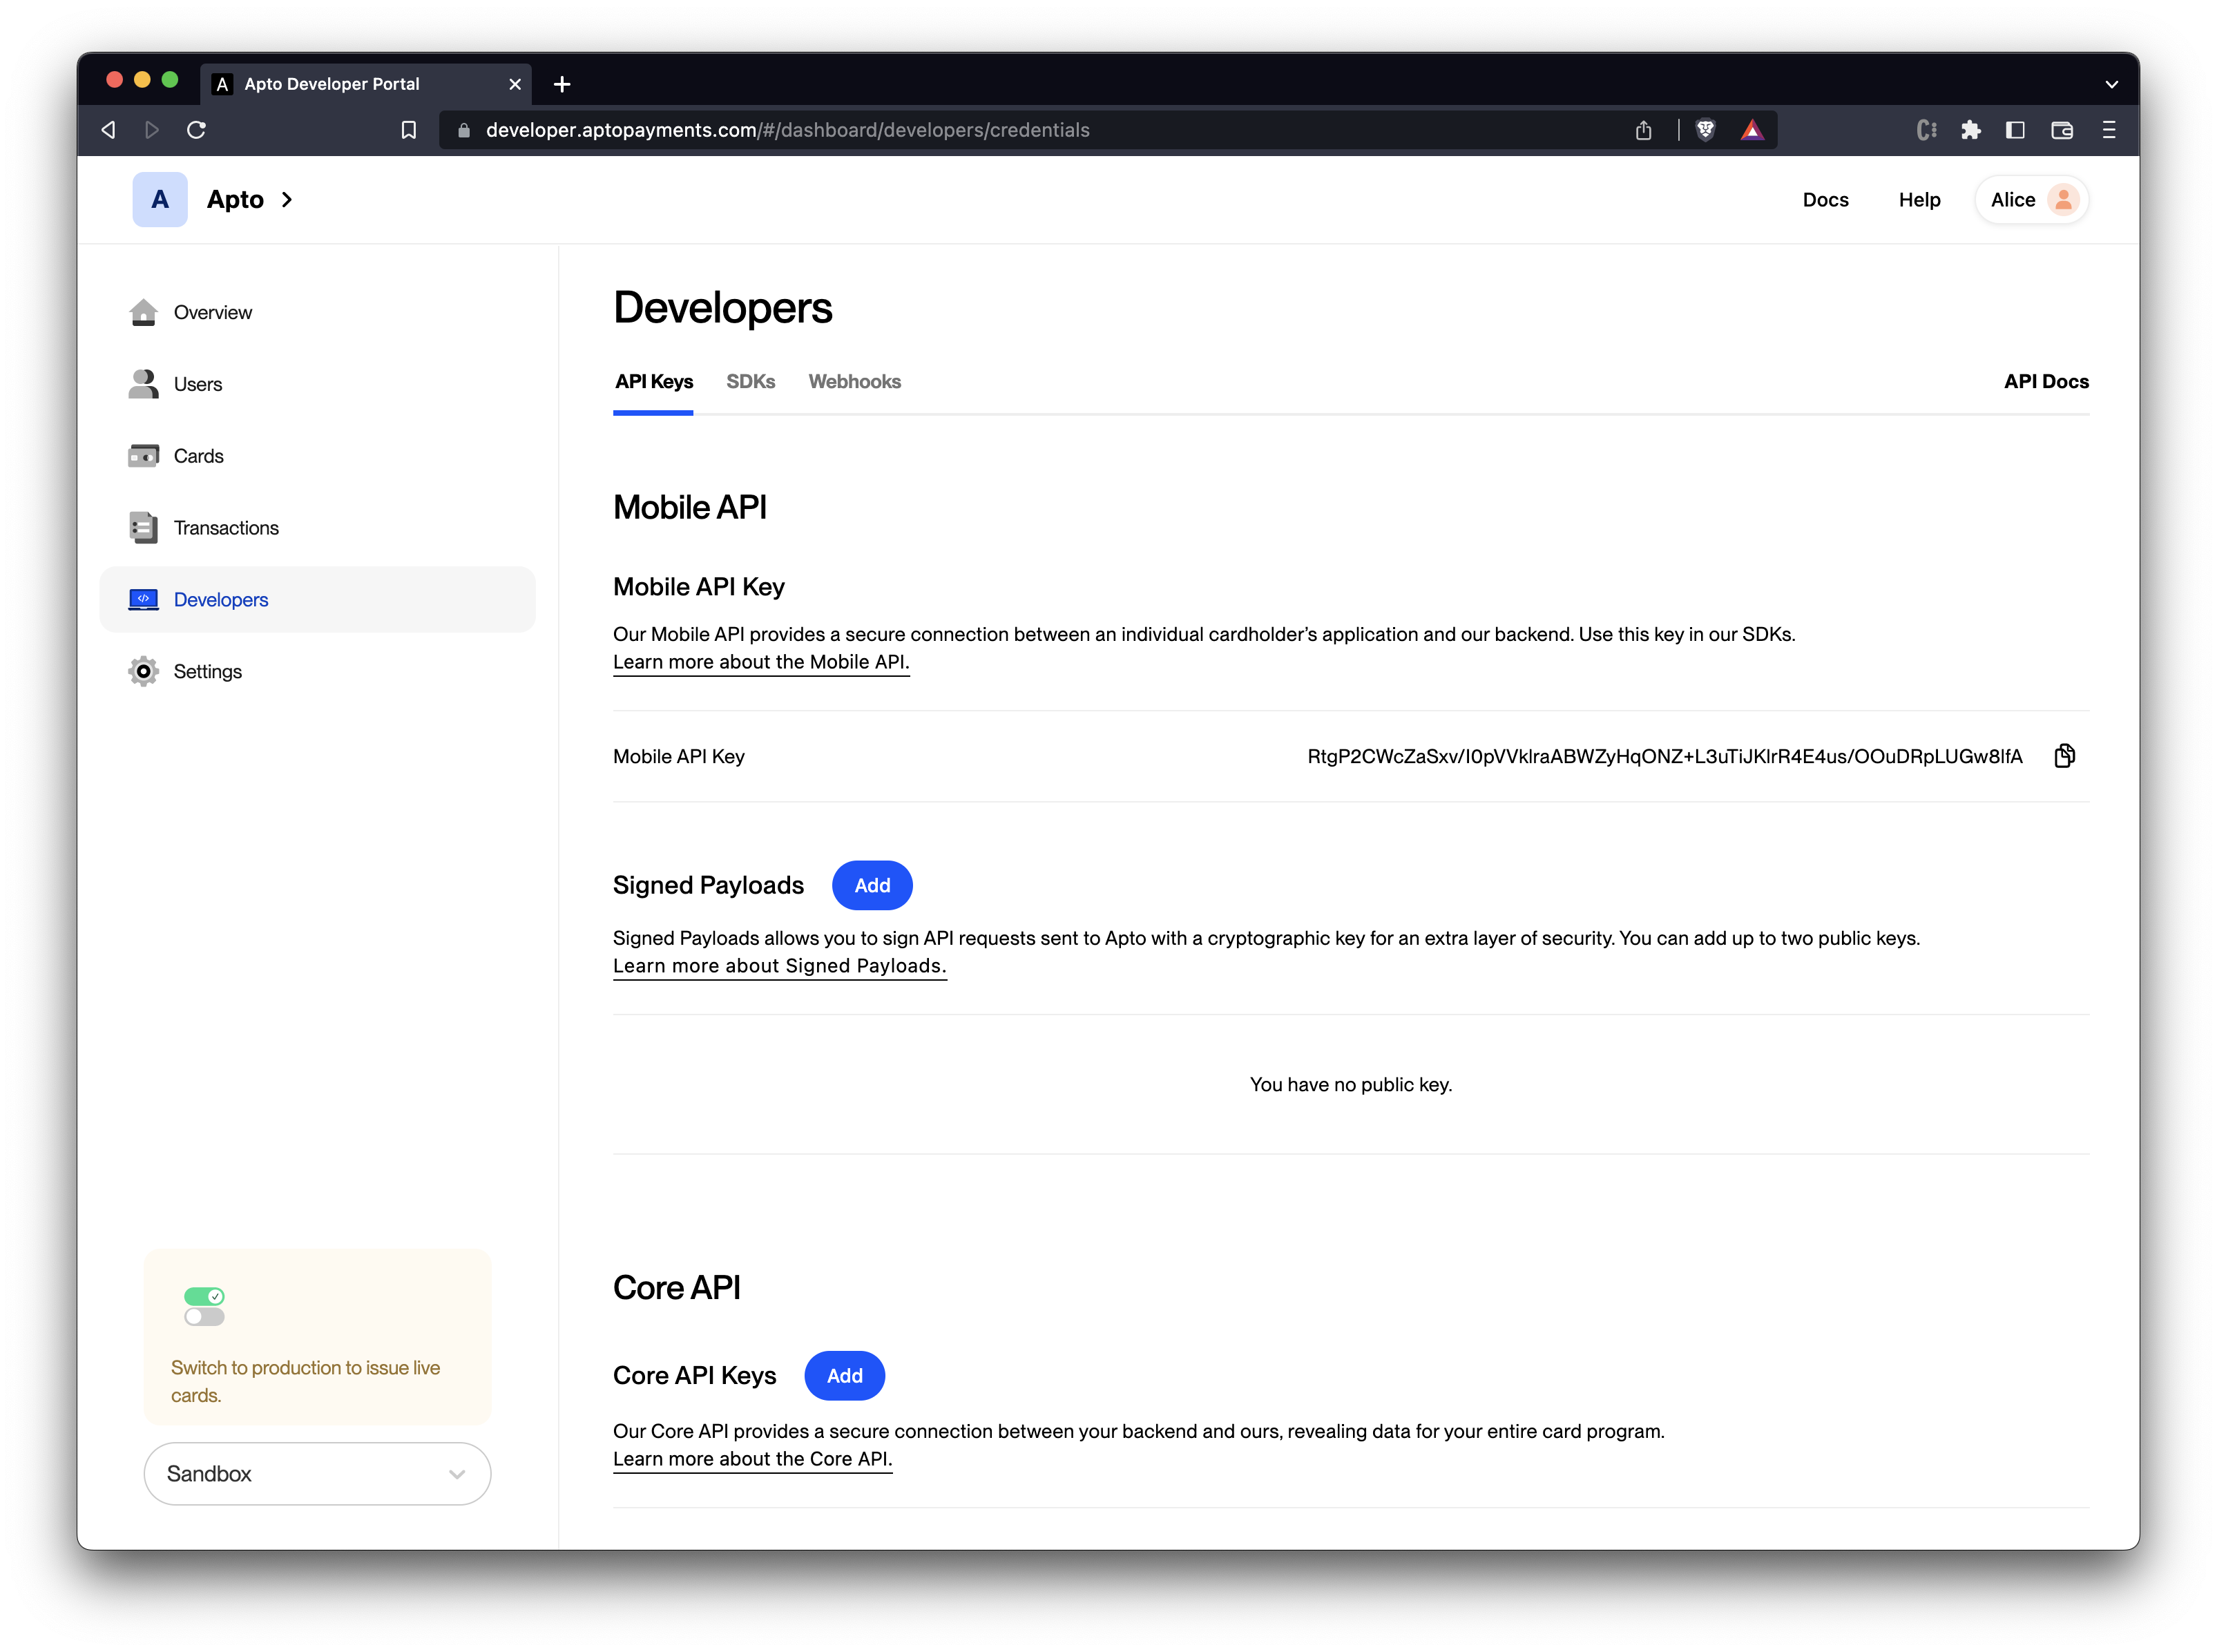
To upload a public key, first navigate to the Developers > API Keys page in the developer portal and within the Signed Payloads section click on Add.
Paste your public key in the space dedicated for this and click Save. Be sure to format your key with the BEGIN and END tags. Don't forget to name your key - please note that key names cannot be changed.

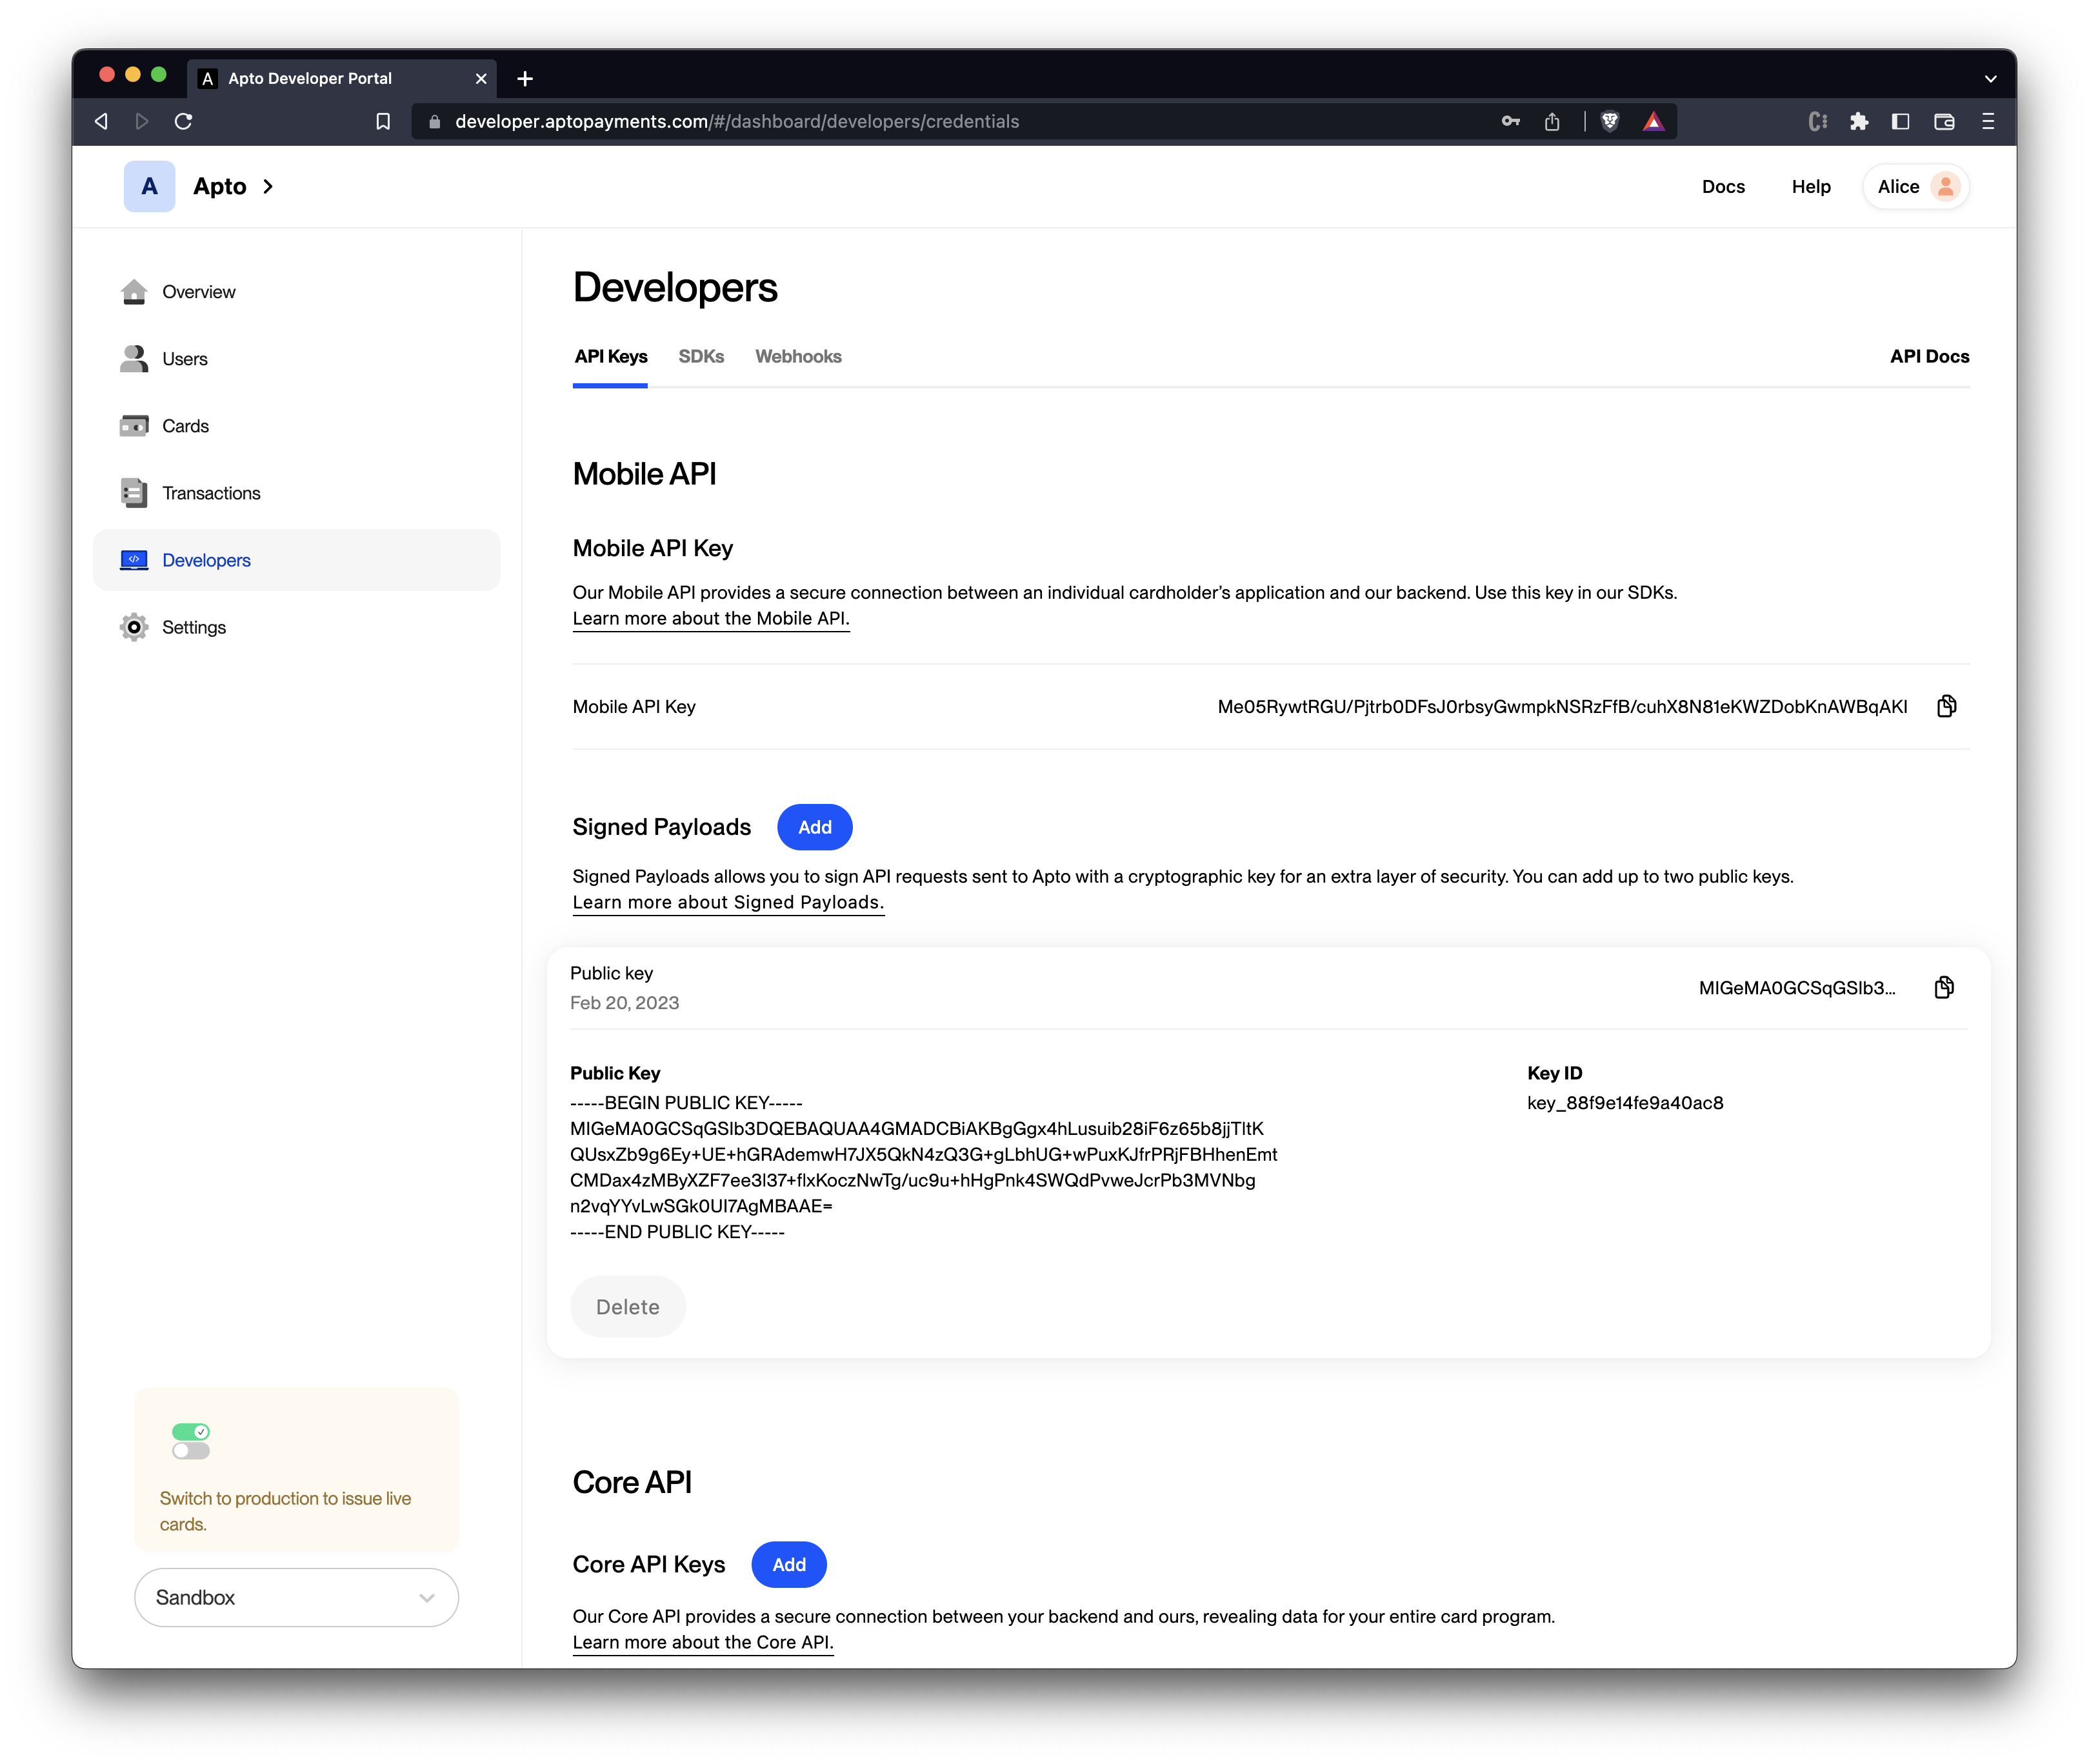
Once your public key is saved, you will be able to view specific information about your key, including the key name, key ID, created date and the stored public key.
You can upload a maximum of two keys at a time, and both keys can be used. To specify which key needs to be used to decrypt the payload you can send the "kid" header in the JWT token.
Once activated, you won't be able to call any endpoint with signed payloads enabled without supplying a JWT token. Make sure you understand how signed payloads work before activating the feature.
You can delete the key by clicking the Delete button on the right. You are required to store at least one key at all times, and a maximum of two keys.
Usage
We recommend implementing a server with an endpoint in charge of signing the payloads. The client should send its payload to the signing endpoint to get it signed through JWT which then can be sent to the Mobile API endpoint with signed payloads enabled. Remember to set application/jwt as the Content-Type header. If you need some additional guidance on JWTs, here are a couple of YouTube videos that might be helpful:
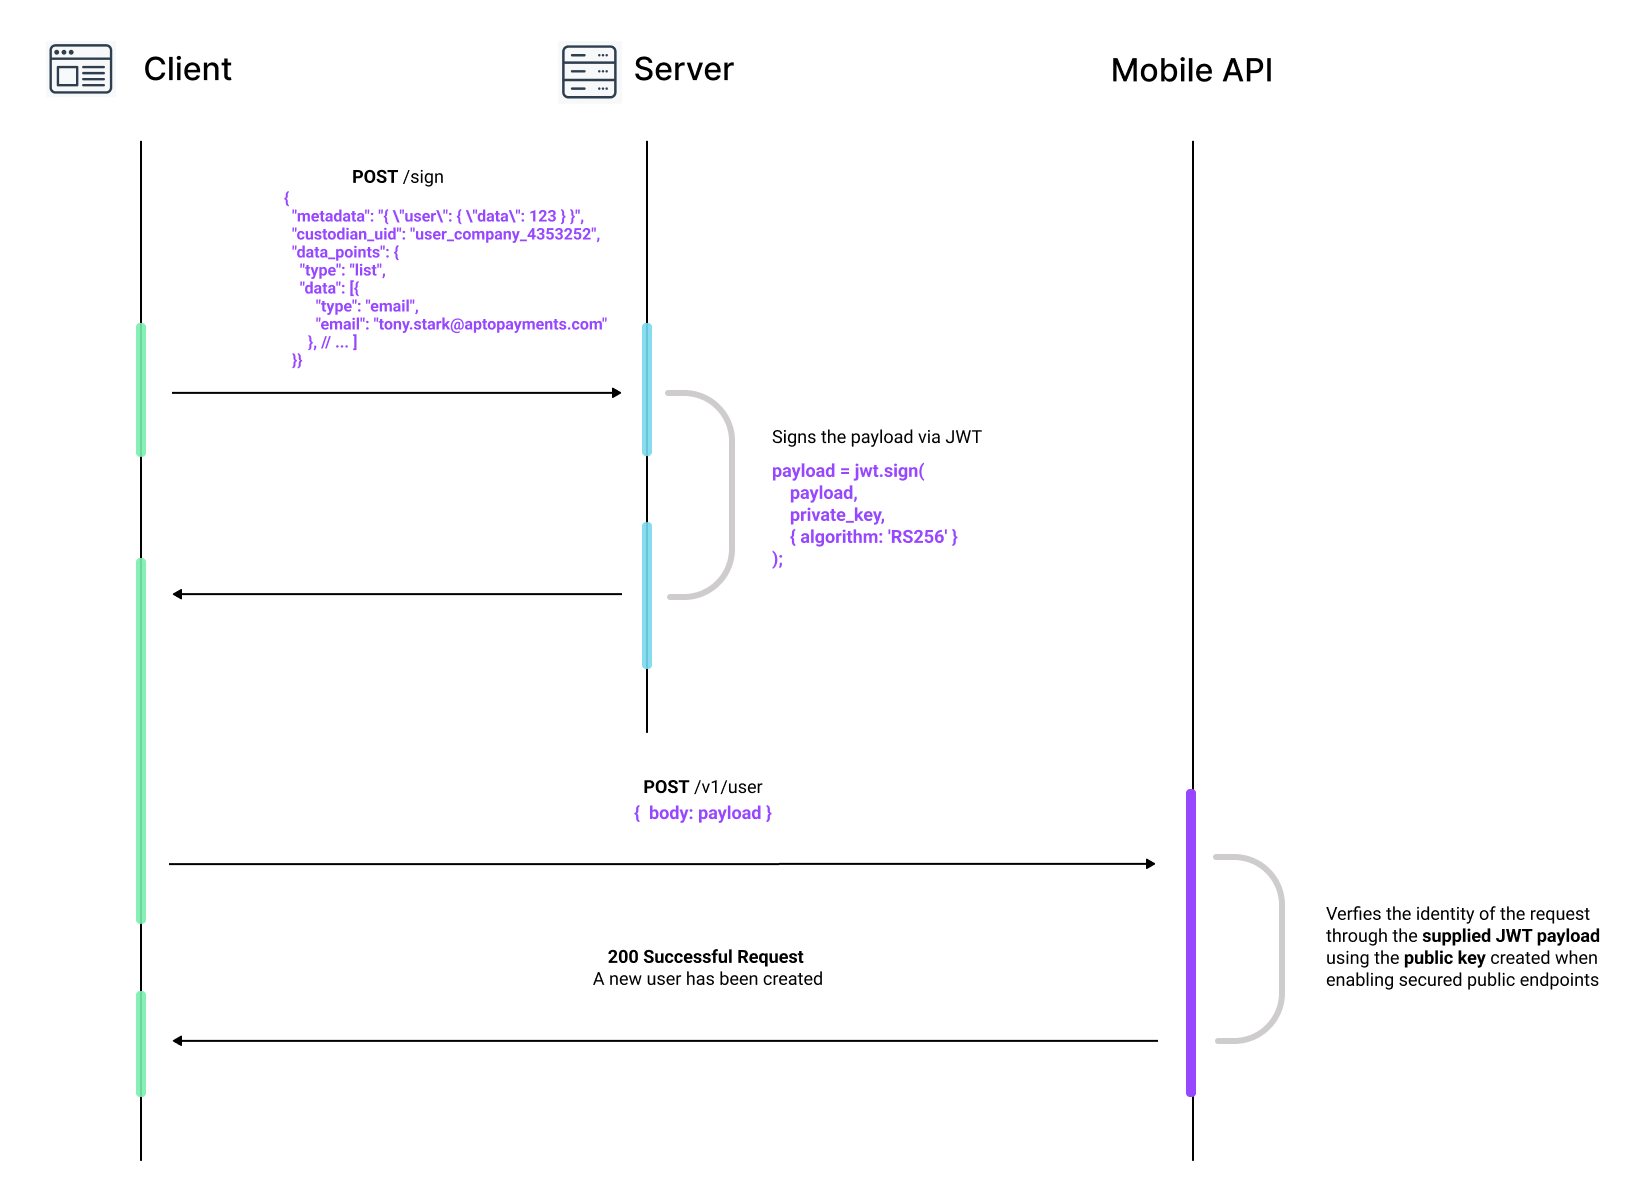
The diagram below represents the whole request flow. In this case, we are trying to call the create user endpoint with signed payloads enabled.
Here's a resource to help you understand how the server can be implemented:
- Javascript
- Python
- Ruby
- Java
const express = require('express');
const app = express();
app.use(express.json());

const jwt = require('jsonwebtoken');
const fs = require('fs');
const privateKey = fs.readFileSync('private.key');

const port = 3000;

app.post('/sign', (req, res) => {
    // Before signing the payload, validate the caller or the body content to make sure you want to sign it.
    // For example, you may want to make sure the caller is an authorized client.

    const payload = jwt.sign(req.body, privateKey, { algorithm: 'RS256' });

    res.status(200).send({
        token: payload,
    });
});

app.listen(port, () => {
    console.log(`Listening at http://localhost:${port}`);
});
from fastapi import FastAPI
import jwt

app = FastAPI()
private_key = 'private_key'

@app.post("/sign")
    async def create_token(body: dict):
    payload = jwt.encode(body, private_key, algorithm='RS256', headers={"kid": "key_1231231231abcdef"})
    return {
        'token': payload
    }
require 'sinatra'
require 'jwt'

post '/sign' do
  rsa_private = OpenSSL::PKey::RSA.new File.read 'rsa-keys.pem'
  data = JSON.parse request.body.read
  payload = JWT.encode data, rsa_private, 'RS256', {:kid => "key_1231231231abcdef"}
  {token: "#{payload}"}.to_json
end
import org.bouncycastle.util.io.pem.PemReader;
import java.security.KeyFactory;
import java.security.spec.PKCS8EncodedKeySpec;
import java.security.interfaces.RSAPrivateKey;
import java.util.HashMap;

public class Main {

        private static String SECRET_KEY = "-----BEGIN RSA PRIVATE KEY-----\nMIIJKQIBAAKCAgEA20jLziNkj6xF+DfA4UkgU8MqC1RYMXN98kas72FnLcqHvoy0\nLJdPu4AZUtlRpykrAoAnsl8e1sdDEFSyHArxseQuhscLMbLm6gaMEn/28Z+0z3RE\nSI4PjOOYqra1CQkTM60QJIWFRTwKj99JgEHklqdVMHAjwZ1/D1QcXxDDi9Scx3KY\nJ7vZmJGjJY34MpIG13+I83mqcBkP3ZK83JgY3HSQMRiOkR+WeKUdMDzlrXJyWfd4\nbkrX8GmsDIRqK1SNMmv0KnisBvftLetdoSymLViW5+BGwBdNAlCOp3h9jSIUDjLb\nPARDpW70O8bWcdoHLmGS++qUXbfMO2f+8DNZABnah8HviczCZwDit725AJVxKHJr\nFJ8MjcUJhyM1++P74RnPSyiJR6oW2trDti1+nbcnOgg+x+Fq7daj3yQmgjvpQ4Ei\n1EsZgT841Z21t5fzkfpfSvKFpb+Q0s/SfuZMvf+cfEbS0cMCmhktn3Km/+MRPdf/\nuLpg3AImrDbJpSirC24Qz8jbWtylbjYNLqY2kmQtMaWGnrRr1NlPLEERFD4+nbya\nhLOjuwMd8Ujsq4E+n0CPael211FwDR9IG8+tpB8spYua+ByMmN+E/YWOlntkuKXF\nsPas0ShyloKZU05JQNDRzDNl3g8S2dBwSKM/9jxyqqxyqUSwc70eMNq1XmsCAwEA\nAQKCAgEAls1zS2pPp/ajj9ZX0RbHIpOfAHeaxzdTsCAmoeFsYbNcsxB0gA33CU1J\nHQ7S9pB7QZb8tdBwlugmGL8GVf64xMvVq16LNjyATQT/o2FZZEWexOSCaRs5WnzS\n6uQHkBUrnWgxJ8yjID/wS40VMR0fpPOixFL6ZBZ54QLJGB+hOzKWNxt5xCmNtTzC\n4/rEa5K9HcpZVoefTMQPgyN8un/m6QVIfFsVAHymsIVsk1Xt5eBE/9YOflr+MhmZ\n9mnB0dat27UeD285bvllpSSuGT9pcNnxvbkhLs1XanYYBNf6D+sVu8YBuz57fvPV\nBp7xrw5vzdfQi2qBagoSa/BTBMFrPD6ZDaryfYdiNDhNYEYsHTGahaVVUExWmVIr\nP/GG+Ph3WC5hPTXLChsaLaxoC9T+7fjt82VJQmBfcITE4+L6bEL8D+1X5MenMVCQ\nnMiyhNM2EOZkioaqHHqa3M2pTJxUR87VA5RLYFCnq8OJJyUEwp3r+Guqj6YtUTI4\nWzOeONnCj+2tZkKa6a+jXYwgsZLpNJSBnlqWlxHIL6+gyzcc2e6okJbhonLdj2QN\nmHihRhflH3LcxusPbMK/yfrPbrce1PQwnZ9oFnFPbDLY416QJ2pN4B8jujZhMrLC\nLXVAfb333gaJN771TzHoIpUbdtfIxKMxMXPVK5WQhxqXJofbWlECggEBAPGrwdFc\nr5MwjM/TH3Ub5DkqEJsZTLEEPnoWl3Gmla6siTM5M0U3W6+1ks3r5P6OMlasElyc\nhrMjYXSbXgfrT3lGRfU2N3f6EZOUgGfddU6BjgE8FVmV4KTbCZgWrBluc8Xwhk6A\nBced/fZ0i/MwZ9ubXawZ6pOPE7hRLqQ3eUebw56Bh8GVYsm1ICc041nDnIMEYY37\nv+/ltT/Z/HVEnv9Zp9qfdeRZHa6dZuuE23gh2zq65//jjDXFS351oeH6mfFvEV9A\ng/wRQoe2/tCuL97Tz4FYMWaPJzutDUlR1WZr2ETlTE2nRQ22JCVu8oICvK81iz/j\n2Xkk7JWM+C2k/PUCggEBAOhJPaE717nzqkKux9+qtmHkJp8U29t/wHgaJpezCHfD\nx+D9MzEZ6sL/dIWLtuPg6zOb7VFiqaOYqnOzmF17YDcny9aPqdt4/mleEwTXWlOP\n6ikRqgUx3i7yOaJkpPnH93AX5A8eI6XUKez2M3baU4kB/UFiqwiKDufMfDiIt5X5\nBDd/Q5NB2uMBIkSFIOTCzVwTHDQYrirB+5yXJgy1vkKG242boBpHi78wzQk6hAqM\nVkjDN/hry5nrjN5UQb/oy5zeF61/Jcp/drqnddIEmCCwKPI9WLMNMmTjb0H+JTQS\nGLpp5vd4vlbOKQXXIkldggG3A1YG+Iok7lfqGLP10d8CggEAejdpSi68YAyCeauE\nUh4r2bjrMvSlczP5QJbiOciMFA0PSYdY5V0skfyaZGcypIVW8bwNgSZrfHadF3Jn\nKEwZIfSm9m5XuOYPM3o7QcueQniETx2KkoaYV+apwG9e03GnPOf5lANsaNn+kD+6\nct789vNoeNuWZM9Lor/zfXrMa6lbUXKiLAUXM3jU7N7zRvcE1MFHcJ1rILAjbEoa\nQVfVrL8zgv13imaC+0aAwQSsVOGSU+4n26HAy4SePDLTDkxEw/NubqRa2wQDiEzE\nKtacQO0PGJN4UCx/I8/NU1H+QNCzS4xGfVLlOhztxLyKCbPGpjjG1iWtWnWQ68Sh\n0buJbQKCAQBGl8OYFYS5KXkr7MwniE0HMPwfyooKiienGGN0JN/E7gX3tVtyZ6r1\n+gaic1RwqrEwLQoReseNRV8/7Gu4tT8HZBvJqD15yqqewQ1Moln8HTePpaOjEoWw\nhMLJPIb6ti/XrBsOER3KTtEzB5uaWj2a3LTnwyGxZauj/Hwf/kS02knSx+V0gkYQ\nSQ7t/fuCKkWY3uHqXznHGs7pxvG0WSNqOmvM/GfKtMWepCkbzeHFBuNOF64R3Eiz\nDWfxRW/577i5grF1c7e7c8NUdIIVAnptLLw06jnjqHYRPSFZz+/khD9pn7emq9ZE\nsUC8WqY736Qb+0+TPGkaKqEYrLc3MdTHAoIBAQC+SBvowDatX+vQEmuJbxpsJDq+\n0cZu3c75qqO/It7XBuz2wN3JNTY45EA3bQGkOASQOwz9P5DWUw2r/xTI2DL9XSu1\n4ddyEPkVu9NpDPRdRg8udr98XWBRxoW3mrbH9aoYn2NrGmkosWBh85RDazllD+cW\nYg07d2jl66BPOyl0ZDlrt2wrN1C83W651IHTY5wuIx0muptrVThWIVASKWe1U6Tj\njt9s+azAt9MTLLCp48hxwP5B8LJMNSTbF2aGUXI8hmqx9UcgrZfT4QPLNpln7aOU\nw2A4EThZOKCRwGz7kH4QN6rVzrV81G7d9MQb+9+8IJtSkIWm/28smBVKlkTE\n-----END RSA PRIVATE KEY-----\n";


        public static void main(String[] args) {
                post("/sign", (req, res) -> jwtCreation(req));
        }

        public static String jwtCreation(Request req) throws NoSuchAlgorithmException, InvalidKeySpecException, IOException {
                java.security.Security.addProvider(
                                new org.bouncycastle.jce.provider.BouncyCastleProvider()
                );
                PemReader pemReader = new PemReader(new StringReader(SECRET_KEY));
                PemObject pemObject;
                pemObject = pemReader.readPemObject();
                KeyFactory factory = KeyFactory.getInstance("RSA");
                byte[] content = pemObject.getContent();
                PKCS8EncodedKeySpec privKeySpec = new PKCS8EncodedKeySpec(content);
                RSAPrivateKey privateKey = (RSAPrivateKey) factory.generatePrivate(privKeySpec);

                HashMap<String, Object> map = new Gson().fromJson(req.body(), HashMap.class);
                Claims claims = Jwts.claims(map);
                SignatureAlgorithm signatureAlgorithm = SignatureAlgorithm.RS256;

                JwtBuilder builder = Jwts.builder().setId("id")
                                .setClaims(claims)
                                    .setHeaderParam("key_id", "key_1231231231abcdef")
                                .signWith(signatureAlgorithm, privateKey);

                return builder.compact();
        }
    }
Once we have the server running and ready to sign payloads, we can call it from a client to get payloads signed before sending them to the Mobile API's create user endpoint:
curl --location --request POST 'https://localhost:3000/sign' \
--header 'Content-Type: application/json' \
--data-raw '{
 "data_points": {
   "type": "list",
   "data": [
       {
           "type": "phone",
           "country_code": "1",
           "phone_number": "2105555555",
           "verification": {"verification_id": "entity_9749a9aea2bccb7a"}
       },
       {
           "type": "id_document",
           "value": "111223333",
           "country": "US",
           "doc_type": "SSN"
       },
       {
           "type": "email",
           "email": "tony.stark@aptopayments.com"
       },
       {
           "type": "birthdate",
           "date": "1965-10-20"
       },
       {
           "type": "name",
           "first_name": "Tony",
           "last_name": "Stark"
      },
      {
           "type": "address",
           "street_one": "Malibu Point 10880",
           "street_two": "",
           "locality": "Malibu",
           "region": "CA",
           "postal_code": "90265",
           "country": "US"
      }
   ]
 }
}'
If all went well, this will return the signed payload as a JWT token in the token field of the response (according to our server implementation above):
{
    "token": "eyJhbGciOiJIUzI1NiIsInR5cCI6IkpXVCJ9.eyJzdWIiOiIxMjM0NTY3ODkwIiwibmFtZSI6IkpvaG4gRG9lIiwiaWF0IjoxNTE2MjM5MDIyfQ.SflKxwRJSMeKKF2QT4fwpMeJf36POk6yJV_adQssw5c"
}
We can now send this token as the payload to the Mobile API endpoint with the signed payloads feature turned on:
curl --location --request POST 'https://api.aptopayments.com/v1/user' \
--header 'Api-Key: Bearer {MOBILE_API_KEY}' \
--header 'Content-Type: application/jwt' \
--data-raw 'eyJhbGciOiJIUzI1NiIsInR5cCI6IkpXVCJ9.eyJzdWIiOiIxMjM0NTY3ODkwIiwibmFtZSI6IkpvaG4gRG9lIiwiaWF0IjoxNTE2MjM5MDIyfQ.SflKxwRJSMeKKF2QT4fwpMeJf36POk6yJV_adQssw5c'
When receiving the payload, the Mobile API will use the public key created when enabling signed payloads in the developer portal to make sure the request comes from the verified origin. If the request is successfully validated, the following success response will be displayed:
{
    "type": "user",
    "user_id": "crdhldr_b04f29605a018f7d72a2",
    "user_token": "{SESSION_TOKEN}",
    "user_data": {
        "type": "list",
        "data": [
            {
                "type": "phone",
                "country_code": "1",
                "phone_number": "2015555555"
            }
        ],
        "page": 0,
        "rows": 5,
        "has_more": true,
        "total_rows": 10
    }
}
Following this approach, you only need to implement one endpoint on your server in charge of signing payloads. You will use this endpoint to obtain the signed payload prior to calling the Mobile API for the create user endpoint.
Testing in sandbox
You can test the verified endpoint in a safe environment while your card program is in Sandbox.
Apto recommends you test this feature in Sandbox after enabling it. When testing the API calls against Sandbox, make sure to append sbx in the origin of the requests to target the correct environment:
- Create user endpoint
https://api.sbx.aptopayments.com/v1/user
To learn more about creating users via the Mobile API, see the creating users tutorial.
You can play and experiment in the live JWT debugger with token creation.